随着Web站点访问量的不断提高,Web服务器处理请求的压力将会日益增大,进而影响到Web站点的性能。当单台Web服务器所能承受的压力到达极限时,就需要有更多的服务器来分担工作,将流量合理转移到更多的服务器上。本文主要介绍通过LVS来组建服务器集群,同时配置反向代理服务器实现Web页面的动静分离,以满足高并发、高可用的生产环境要求。 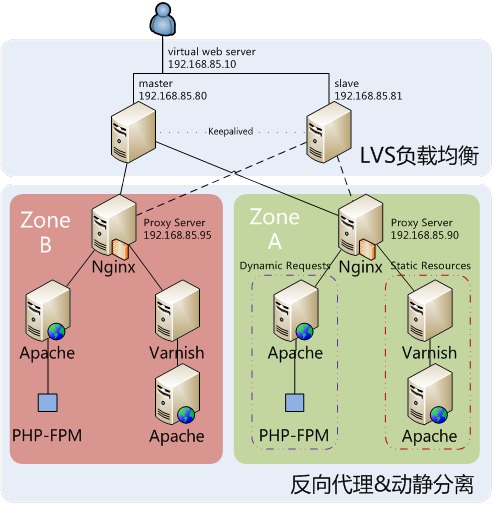 两台LVS服务器,两台反向代理服务器,两台静态内容缓存服务器,两台动态请求处理服务器,具体用途说明详见下表。
说明: (1) zone(区域)可以代表为机柜、交换机甚至是数据中心,将站点架设在不同的zone上,是出于容灾的考虑,以此减小Web站点因单点故障而造成无法访问的风险; (2) 使用nginx作为纯粹的反向代理服务器,将静态页面的访问请求交给Varnish,动态请求交给Apache处理,nginx本身只负责记录请求访问的接入状况以及wap请求的跳转; (3) 静态资源模块选用Varnish做cache缓存,与传统的Squid相比,Varnish具有性能更高、速度更快、管理更方便等诸多优点,分析如下:
2、安装与配置说明 系统环境:CentOS6.4 x86_64,内核:Linux version 2.6.32-358.el6 2.1 Apache与PHP-FPM 安装动态请求模块的机器IP如下: 192.168.85.93 192.168.85.971. 安装编译相关的依赖包 yum install httpd httpd-devel apr apr-devel libtool make gcc etc/init.d/httpd start这时,直接在浏览器中输入服务器的IP地址,即可看到Apache2的默认页面。 2. 下载mod_fastcgi源代码 cd /opt/ wget http://www.fastcgi.com/dist/mod_fastcgi-current.tar.gz3. 解压并进行编译安装 tar zxvf mod_fastcgi-2.4.6.tar.gz cd mod_fastcgi-2.4.6 cp Makefile.AP2 Makefile vim Makefile修改top_dir目录,64位系统的路径为lib64,32位系统的路径为/usr/lib/httpd … top_dir = /usr/lib64/httpd …保存退出后,开始进行编译安装。 make&& make install 4. 加载模块 # vim /etc/httpd/conf/httpd.conf 找到LoadModule部分,添加一行加载语句 ... LoadModule fastcgi_module modules/mod_fastcgi.so ... 5. 重启服务 /etc/init.d/httpd restart如果能正常启动,则log里面将显示以下信息 # grep -i "FastCGI" /var/log/httpd/error_log [Mon Jul 29 06:54:27 2013] [notice] FastCGI: process manager initialized (pid 2098) [Mon Jul 29 06:54:27 2013] [notice] Apache/2.2.15 (Unix) DAV/2 mod_fastcgi/2.4.6 configured -- resuming normal operations 6. 安装PHP-FPM(FastCGI进程管理器) PHP-FPM(FastCGI 进程管理器)用于替换 PHP FastCGI 的大部分附加功能,对于高负载网站是非常有用的。 # yum install php-fpm # /etc/init.d/php-fpm start # chkconfig php-fpm on # netstat -anp |grep php tcp 0 0 127.0.0.1:9000 0.0.0.0:* LISTEN 2575/php-fpm unix 3 [ ] STREAM CONNECTED 25812 2575/php-fpm unix 3 [ ] STREAM CONNECTED 25811 2575/php-fpm 7. 修改配置 新建一个配置文件/etc/httpd/conf.d/fastcgi.php.conf DirectoryIndex index.html index.shtml index.cgi index.php AddHandler php5-fcgi .php Action php5-fcgi /php5-fcgi Alias /php5-fcgi /var/www/cgi-bin/php5-fcgi FastCgiExternalServer /var/www/cgi-bin/php5-fcgi -idle-timeout 60 -host 127.0.0.1:9000 -pass-header Authorization重启Apache和PHP-FPM: service httpd restart service php-fpm restart 2.2 Varnish与Apache 安装静态缓存模块的机器IP如下: 192.168.85.91 192.168.85.96 1. 安装repo源及软件 # rpm --nosignature -i http://repo.varnish-cache.org/redhat/varnish-3.0/el6/noarch/varnish-\ release-3.0-1.el6.noarch.rpm # yum install varnish # yum install httpd 2. 修改配置文件 (1) Apache的默认服务端口更改为8080 … #Listen 12.34.56.78:80 Listen 8080 … 启动Apache服务: service httpd start (2) Varnish需要配置好后端服务器Apache的位置,以便找到需要缓存加速的文件。
# vim /etc/varnish/default.vcl
backend default {
      .host = "127.0.0.1";
      .port = "8080";
}
3. 启动Varnish varnishd -f /etc/varnish/default.vcl -s malloc,1G -T 127.0.0.1:2000 -a 0.0.0.0:80其中,-f指定的是Varnish配置文件位置,-s指定分配的缓存空间大小,-T为Varnish管理接口的监听地址,-a指定对外接收HTTP请求的监听地址。 2.3 Nginx反向代理 安装反向代理模块的机器IP如下: 192.168.85.90 192.168.85.95 1. 安装repo源及软件 # rpm -Uvh http://dl.fedoraproject.org/pub/epel/6/x86_64/epel-release-6-8.noarch.rpm # yum install nginx 2. 修改配置文件 主配置文件/etc/nginx/nginx.conf无需做太大改动,只需将worker_processes设置成与机器CPU核数相等即可(如CPU数为1,则worker_processes 1;),以zone A为例:
# vim /etc/nginx/conf.d/virtual.conf
upstream backend {
    server 192.168.85.90;
}
server {
    listen           80;
    server_name     192.168.85.91;
# 静态缓存
    location / {
        proxy_pass http://backend;
    }
# 动态请求
    location ~ \.(php)?$ {
        proxy_set_header Host $host;
        proxy_set_header X-Real-IP $remote_addr;
        proxy_set_header X-Forwarded-For $proxy_add_x_forwarded_for;
        proxy_pass http:// 192.168.85.93;
    }
}
3. 启动nginx服务 service nginx start 2.4 LVS负载均衡 安装负载均衡模块的机器IP如下: 192.168.85.80 192.168.85.81LVS有四种常见的工作模式:NAT、DR、TUNNEL、FNAT。本文选用的工作模式为DR(Direct Route),负载均衡器接收用户的请求,然后根据负载均衡算法选取一台realserver,将包转发过去,最后由realserver直接回复给用户。 1. 下载所需软件 #cd /opt/ # wget http://www.linuxvirtualserver.org/software/kernel-2.6/ipvsadm-1.24.tar.gz # wget http://www.keepalived.org/software/keepalived-1.1.18.tar.gz # yum install -y openssl openssl-devel* popt* 2. 安装ipvsadm(master和backup都需要安装) 首先,建立内核快捷方式 # ln -s /usr/src/kernels/2.6.32-358.14.1.el6.x86_64/ /usr/src/linux如果没有找到相关路径或文件,则需要手动安装内核 # yum -y install kernel-devel然后,解压并编译ipvsadm # cd /opt/ # tar zxvf ipvsadm-1.24.tar.gz # cd ipvsadm-1.24 # make # make install接下来,测试ipvsadm是否安装成功 # /sbin/ipvsadm –v ipvsadm v1.24 2005/12/10 (compiled with getopt_long and IPVS v1.2.1)显示上述信息则表示安装成功。 3. 安装keepalived(master和backup都需要安装) # cd /opt/ # tar zxvf keepalived-1.1.18.tar.gz # cd keepalived-1.1.18 # ./configure --prefix=/usr/local/keepalived # make # make install # cd /usr/local/keepalived/ # cp etc/rc.d/init.d/keepalived /etc/rc.d/init.d/ # cp etc/sysconfig/keepalived /etc/sysconfig/ # mkdir /etc/keepalived # cp etc/keepalived/keepalived.conf /etc/keepalived/ # cp sbin/keepalived /usr/sbin/启动keepalived # service keepalived start 4. 修改master和backup的配置文件 首先,开启ip_forward转发功能 # sysctl -w net.ipv4.ip_forward=1然后,配置keepalived.conf文件
# vim /etc/keepalived/keepalived.conf
! Configuration File for keepalived

global_defs {
   notification_email {
     acassen@firewall.loc
     failover@firewall.loc
   }
   notification_email_from Alexandre.Cassen@firewall.loc
   smtp_server 192.168.200.1
   smtp_connect_timeout 30
   router_id LVS_DEVEL
}

vrrp_instance VI_1 {
    state MASTER                           # 备份服务器上将MASTER改为BACKUP
    interface eth0                           # HA监测网络接口
    virtual_router_id 51                      # 主、备机的virtual_router_id必须相同
    priority 30                              # 主、备机取不同的优先级,主机值较大,备份机值较小
    advert_int 1                             # VRRP Multicast广播周期秒数
    authentication {
        auth_type PASS                      # VRRP认证方式
        auth_pass 1111                      # VRRP口令字
    }
    virtual_ipaddress {
        192.168.85.10                       # 如果有多个VIP,继续换行填写
    }
}

virtual_server 192.168.85.10 80 {
    delay_loop 2                            # 每隔2秒查询realserver状态
    lb_algo rr                               # lvs 算法
    lb_kind DR                              # Direct Route

    persistence_timeout 50                   # 同一IP的连接50秒内被分配到同一台realserver
    protocol TCP                            # 用TCP协议检查realserver状态


    real_server 192.168.85.90 80 {
        weight 80
        TCP_CHECK {
            connect_timeout 3
            nb_get_retry 3
            delay_before_retry 3
        }
    }

    real_server 192.168.85.95 80 {
        weight 20
        TCP_CHECK {
            connect_timeout 3
            nb_get_retry 3
            delay_before_retry 3
        }
    }
}
BACKUP服务器同上配置,先安装lvs再按装keepalived,仍后配置/etc/keepalived/keepalived.conf,只需将红色标示的部分改一下即可。5. 配置VIP # vim /etc/sysconfig/network-scripts/ifcfg-lo:0 DEVICE=lo:0 IPADDR=192.168.85.10 NETMASK=255.255.255.255 ONBOOT=yes NAME=loopback重启网卡和keepalived服务即可。 6. 配置ipvsad m(master和backup都需要设置好) 添加负载均衡器 /sbin/ipvsadm -A -t 192.168.85.10:80 -s rr增加realserver /sbin/ipvsadm -a -t 192.168.85.10:80 -r 192.168.85.90:80 -g # 192.168.85.90是真实机的ip /sbin/ipvsadm -a -t 192.168.85.10:80 -r 192.168.85.95:80 -g # 192.168.85.95是真实机的ip route add -host 192.168.85.10 dev lo:0 7.配置realserver(所有的Proxy Server都要设置好) 配置vip地址 /sbin/ifconfig lo:0 192.168.85.10 netmask 255.255.255.255 broadcast 192.168.85.10 up route add -host 192.168.85.10 dev lo:0 3、环境测试 3.1 Apache与PHP-FPM 创建phpinfo页面,查看详细配置信息。 echo "<?php phpinfo(); ?>" > /var/www/html/info.php浏览器中访问http://192.168.85.93/info.php,显示页面如下。 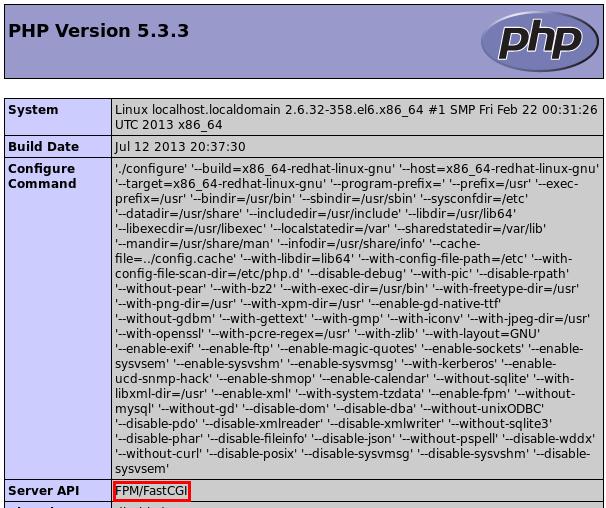 3.2 Varnish与Apache 输入varnishstat指令查看varnish运行情况,最重要的是 cache_hit 和 cache_miss 这两行。如果没有任何命中,cache_hits 不会显示。当越来越多的请求进来,计数器会不断更新以反应新的命中数和未命中数。 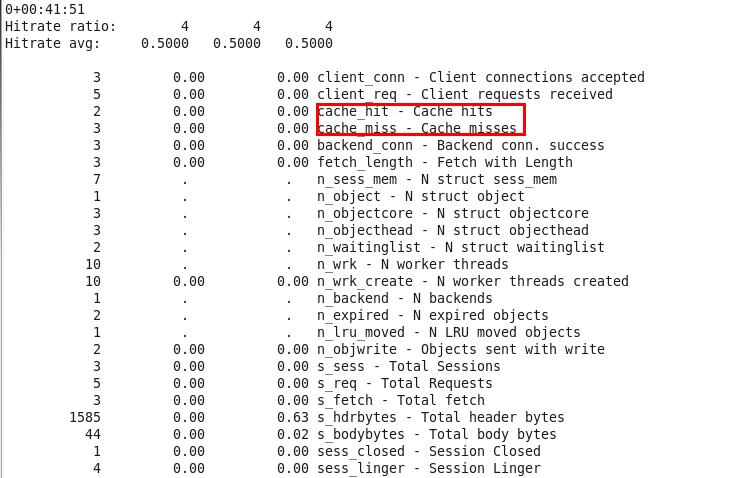 显示varnish和客户端之间的通信(忽略后端web服务器): varnishlog -b显示varnish接收到的HTTP头信息(既有客户端请求的,也有web服务器响应的): varnishlog -c -i RxHeader只显示web服务器响应的头信息: varnishlog -Dw /var/log/varnish.log从/var/log/varnish.log中读取所有日志信息 kill `cat /var/run/varnish.pid`这个命令会从/var/run/varnish.pid中读取varnish的主进程的PID,并给这个进程发送TERM信号,从而关闭varnish。 3.3 Nginx 通过分别访问静态页面(.html)和动态页面(.php),测试动静分离是否生效,以zone A为例: 访问静态页面: # curl –I http://192.168.85.90/index.html HTTP/1.1 200 OK Server: nginx/1.0.15 Date: Tue, 30 Jul 2013 05:58:21 GMT Content-Type: text/html; charset=UTF-8 Connection: keep-alive Last-Modified: Sun, 28 Jul 2013 19:30:16 GMT ETag: "bff82-16-4e29767d7c8be" Content-Length: 22 Accept-Ranges: bytes X-Varnish: 810334599 Age: 0 Via: 1.1 varnish访问动态页面: # curl –I http://192.168.85.90/info.php HTTP/1.1 200 OK Server: nginx/1.0.15 Date: Tue, 30 Jul 2013 06:00:23 GMT Content-Type: text/html; charset=UTF-8 Connection: keep-alive X-Powered-By: PHP/5.3.3 3.4 LVS负载均衡 首先,静态资源服务器中新建一个index.html页面,然后,再验证LVS是否能提供服务。 Zone A:192.168.85.91 # echo " This is zone A! " > /var/www/html/index.html Zone B:192.168.85.96 # echo " This is zone B! " > /var/www/html/index.html在master机器上查看负载均衡器的运行状况: # ipvsadm -L -n IP Virtual Server version 1.2.1 (size=4096) Prot LocalAddress:Port Scheduler Flags -> RemoteAddress:Port Forward Weight ActiveConn InActConn TCP 192.168.85.10:80 rr persistent 50 -> 192.168.85.90:80 Route 40 0 0 -> 192.168.85.95:80 Route 1 0 0访问Web站点,从浏览器页面可知,访问请求跳转到了zone A 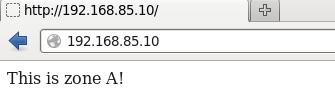 (注意清空浏览器缓存) 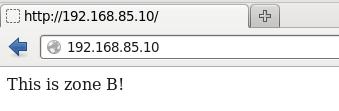 from:http://my.oschina.net/alanlqc/blog/151395 转载请保留固定链接: https://linuxeye.com/Linux/1889.html |