1.首先去SyntaxHighlighter官方网站下载 http://alexgorbatchev.com/SyntaxHighlighter/download/,建议下载2.1版本,貌似大家都说3.0版本的不支持自动换行,这里使用的是2.1.382版本。将下载的文件解压在syntaxHighlight文件夹里,去除里面无用的文件,只留下scripts和styles文件夹。 2. 新建dialogs文件夹,在里面新建一个名为syntaxhighlight.js的文件,因代码量过大,不宜贴出,请直接下载syntaxhighlight.js后者下载我做好的压缩包 https://linuxeye.com/include/ckeditor/plugins/syntaxhighlight/dialogs/syntaxhighlight.js 3. 然后新建images文件夹,存放一个syntaxhighlight.gif图片文件,该图片文件在编辑器工具栏上显示,可以使用16*16像素的图片 https://linuxeye.com/include/ckeditor/plugins/syntaxhighlight/images/syntaxhighlight.gif 4. 新建lang文件夹,是语言包,里面有两个文件,一个是中文cn.js一个是英文en.js cn.js代码如下:
CKEDITOR.plugins.setLang('syntaxhighlight', 'cn',
 {
     syntaxhighlight:
     {
         title: '添加或更新代码',
         sourceTab: '代码',
         langLbl: '选择语言',
         advancedTab: '高级',
         hideGutter: '隐藏分割线',
         hideGutterLbl: '隐藏分割线和行号',
         hideControls: '隐藏工具栏',
         hideControlsLbl: '隐藏浮动工具栏',
         collapse: '代码折叠',
         collapseLbl: '默认折叠代码块 (需要启用工具栏)',
         lineWrap: '自动换行',
         lineWrapLbl: '关闭自动换行',
         autoLinks: '自动链接',
         autoLinksLbl: '不自动转换超链接',
         lineCount: '起始行号',
         highlight: '高亮行号',
         highlightLbl: '输入以逗号分隔的行号, 如 <em>3,10,15</em>.'
     }
 });
en.js代码如下:
CKEDITOR.plugins.setLang('syntaxhighlight', 'en',
 {
     syntaxhighlight:
     {
         title: 'Add or update a code snippet',
         sourceTab: 'Source code',
         langLbl: 'Select language',
         advancedTab: 'Advanced',
         hideGutter: 'Hide gutter',
         hideGutterLbl: 'Hide gutter & line numbers.',
         hideControls: 'Hide controls',
         hideControlsLbl: 'Hide code controls at the top of the code block.',
         collapse: 'Collapse',
         collapseLbl: 'Collapse the code block by default. (controls need to be turned on)',
         showColumns: 'Show columns',
         showColumnsLbl: 'Show row columns in the first line.',
         lineWrap: 'Disable line wrapping',
         lineWrapLbl: 'Switch off line wrapping.',
         lineCount: 'Default line count',
         highlight: 'Highlight lines',
         highlightLbl: 'Enter a comma seperated lines of lines you want to highlight, eg <em>3,10,15</em>.'
     }
 });
CKEDITOR.plugins.add("syntaxhighlight", {
     requires : [ "dialog" ],
     lang : [ "cn" ],
     init : function(a) {
         var b = "syntaxhighlight";
         var c = a.addCommand(b, new CKEDITOR.dialogCommand(b));
         c.modes = {
             wysiwyg : 1,
             source : 1
         };
         c.canUndo = false;
         a.ui.addButton("Code", {
             label : a.lang.syntaxhighlight.title,
             command : b,
             icon : this.path + "images/syntaxhighlight.gif"
         });
         CKEDITOR.dialog.add(b, this.path + "dialogs/syntaxhighlight.js")
     }
 });
7. 由于dedecms 5.7自己集成了一个dedepage插件,用来添加ckeditor自定义插件,在include/ckeditor/plugins /dedepage文件夹下,打开plugin.js文件大概在28行(requires : [ 'fakeobjects' ],):requires : [ 'syntaxhighlight' ],其中syntaxhighlight为代码高亮插件的文件夹名,添加完之后的代码如下:
// Register a plugin named "dedepage".
(function()
{
    CKEDITOR.plugins.add( 'dedepage',
    {
        init : function( editor )
        {
            // Register the command.
            editor.addCommand( 'dedepage',{
                exec : function( editor )
                {
                    // Create the element that represents a print break.
                    // alert('dedepageCmd!');
                    editor.insertHtml("#p #副标题# e#");
                }
            });
            // alert('dedepage!');
            // Register the toolbar button.
            editor.ui.addButton( 'MyPage',
            {
                label : '插入分页符',
                command : 'dedepage',
                icon: 'images/dedepage.gif'
            });
            // alert(editor.name);
        },
        requires : [ 'fakeobjects' ],
        requires : [ 'syntaxhighlight' ]
    });
})();
8. 修改include/ckeditor/ckeditor.inc.php文件,在$toolbar['Basic']的最后一行添加元素Code,修改后代码如下:
$toolbar['Basic'] = array(
            array( 'Source','-','Templates'),
            array( 'Cut','Copy','Paste','PasteText','PasteFromWord','-','Print'),
            array( 'Undo','Redo','-','Find','Replace','-','SelectAll','RemoveFormat'),
            array( 'ShowBlocks'),array('Image','Flash','Addon'),array('Maximize'),'/',
            array( 'Bold','Italic','Underline','Strike','-'),
            array( 'NumberedList','BulletedList','-','Outdent','Indent','Blockquote'),
            array( 'JustifyLeft','JustifyCenter','JustifyRight','JustifyBlock'),
            array( 'Table','HorizontalRule','Smiley','SpecialChar'),
            array( 'Link','Unlink','Anchor'),'/',
            array( 'Styles','Format','Font','FontSize'),
            array( 'TextColor', 'BGColor', 'MyPage','MultiPic','Code')
        );
9. 到这一步,编辑器的修改已经完成,修改后的syntaxhighlight文件夹文件目录结构如下:
# tree include/ckeditor/plugins/syntaxhighlight/
include/ckeditor/plugins/syntaxhighlight/
├── code.js
├── dialogs
│   └── syntaxhighlight.js
├── images
│   └── syntaxhighlight.gif
├── lang
│   ├── cn.js
│   └── en.js
├── plugin.js
├── scripts
│   ├── clipboard.swf
│   ├── shBrushAS3.js
│    ...
│   └── shLegacy.js
└── styles
    ├── help.png
     ...
    └── shThemeRDark.css

5 directories, 45 files
将syntaxhighlight文件夹上传到include/ckeditor/plugins/文件夹下,打开后台,添加文章试一下,看看编辑器的上最后一行是否出现了如图所示的按钮:  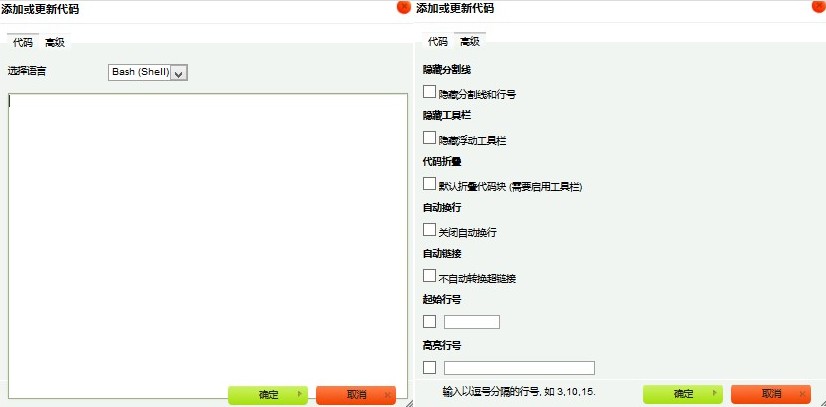
我修改后下载地址:http://pan.baidu.com/share/link?shareid=828332144&uk=2586215667 10.在文章模板文件templets/default/article_article.htm文件里引入高亮显示的js、css,建议将引入的代码放在</body>标签之前,等待前面的网页加载完后加载,进行显示。 引入代码如下:
<script language="javascript" type="text/javascript" src="{dede:global.cfg_cmsurl/}/include/ckeditor/plugins/syntaxhighlight/code.js" ></script>
<link type="text/css" rel="stylesheet" href="{dede:global.cfg_cmsurl/}/include/ckeditor/plugins/syntaxhighlight/styles/shCore.css"/>
<link type="text/css" rel="stylesheet" href="{dede:global.cfg_cmsurl/}/include/ckeditor/plugins/syntaxhighlight/styles/shThemeDefault.css"/>
<script type="text/javascript">
    SyntaxHighlighter.config.clipboardSwf = '{dede:global.cfg_cmsurl/}/include/ckeditor/plugins/syntaxhighlight/scripts/clipboard.swf';
    SyntaxHighlighter.all();
</script>
以上整合方法基本都能Google到,但是,代码高亮后,如果利用dedecms文档关键词给文章自己加关键词链接,高亮后的代码中如果有关键词链 接,SyntaxHighlighter直接显示源码(<a href='$key_url' target='_blank'><u>$key</u></a>),请看下面11步骤 11. 在dedecms文章页自动添加关键词内链锚文本php文件include/arc.archives.class.php加入如下规则(1213行,//恢复超链接 的下一行):
$body = preg_replace("#<pre class=\"brush:(.*)\">(.*)(<a(.*))><u>(.*)<\/u><\/a>(.*)<\/pre>#isU", '<pre class="brush: \\1">\\2\\5\\6</pre>', $body);
转载请保留固定链接: https://linuxeye.com/jianzhan/1793.html |